Snowflake Native App
The dlt Connector App is a Snowflake Native App that lets you move data from external SQL databases (PostgreSQL, MySQL, MSSQL) into Snowflake using a simple web UI. It runs entirely within your Snowflake account — no external infrastructure required.
You can:
- connect an external SQL database to Snowflake
- create one or more pipelines (each pipeline defines what to load and where)
- run pipelines on demand
- schedule pipelines to run automatically
- monitor runs and inspect logs
without leaving Snowflake.
Under the hood, the app uses Snowflake-managed compute and dlt to extract, normalize, and load data into your destination database, while keeping credentials stored securely in your account.
This documentation explains how to set up sources, create and manage pipelines, monitor runs, and troubleshoot common issues.
How to use the Snowflake Native App
Prerequisites
Before creating your first pipeline, make sure you have:
- A destination database in Snowflake where the loaded data should land
- A role with permissions to approve External Access Integrations (
ACCOUNTADMIN, or a role with that privilege) - Connection details for your source database, including:
- host + port
- database name / schema
- username + password
- (Optional) An S3 bucket if you plan to stage data externally
Install and open the app
Use the link we provided to you or find and install the app via the Snowflake Marketplace.
Set up connection
Before creating a pipeline, you need to set up a connection — a secure, approved link between your Snowflake account and your source database.
Go to the Connections tab. It has three sub-tabs: Create, Manage, and Approve.
Snowflake controls outbound network access through External Access Integrations (EAIs). Creating one requires an ACCOUNTADMIN to approve the connection before it can be used. Once approved, the connection is available to every role that has access to the app.
The app handles this for you: it creates a specification requesting the EAI, and an admin approves it in the Connections → Approve tab.

Create a connection
In the Connections → Create tab, select the connection type:
- database - for PostgreSQL, MySQL, or MSSQL sources
- stage - for an S3 bucket used as an intermediate staging area
For a database connection, fill in:
- Connection name - a unique label (e.g. rfam_public_db)
- Database type - MySQL, PostgreSQL, or MSSQL
- Host - hostname of the source database (e.g. mysql-rfam-public.ebi.ac.uk)
- Port - leave empty to use the default port for the selected database type
- Username - database user
- Password - stored securely as a Snowflake secret
Click Create connection. This creates a Network Rule (specifying the allowed host and port), a Secret (storing the credentials), and an External Access Integration — all without requiring admin involvement. Finally, it submits an approval request that an ACCOUNTADMIN must review before the connection becomes active.
Approve a connection
Once a connection is awaiting approval, an ACCOUNTADMIN must approve it. In the Connections → Approve tab, click Review pending connections to open Snowflake's native approval UI.
After approval, the connection status automatically changes to ACTIVE and it becomes available for use in pipelines.
Manage connections
The Connections → Manage tab shows all your connections and their current status. You can delete a connection from here. This removes all associated objects (Network Rule, Secret, External Access Integration, and Specification).
Create a pipeline
- Go to the pipeline tab in the UI
- Enter a pipeline name
- Click the + button to create the pipeline
- Fill in the configurations

Fill in the configuration
- Pipeline name
A unique ID for this pipeline. It is used to store configuration and to identify runs.
Source settings
Source settings define what to ingest from your external SQL database and how to connect to it. These values are used to configure the dlt.sources.sql_database pipeline.
Required fields
-
Database type
Select the type of SQL database you want to ingest from. The selected type determines the driver and default connection behavior.The following database types are currently supported:
- MySQL
- PostgreSQL
- MSSQL
If you need support for a different database type, please reach out via our contact form.
-
Host and port
Enter the hostname and port of your source database. If you leave the port empty, the app will use the database type’s default port. -
Database name
The name of the source database to connect to. -
Database connection Select an active connection from the dropdown. If no connections appear, go to the Connections tab and complete setup first.
Optional fields
-
Schema name
Specify a schema to ingest from. Leave empty to use the default schema of the database/user. -
Chunk size
Number of rows fetched per batch during extraction. Larger values reduce round trips but increase memory usage. -
Table backend
Choose the backend used to introspect and read tables. If unsure, keep the default SQLAlchemy.
See the backend options in the verified source docs. -
JSON format configuration (advanced)
Provide additionalsql_databasesource options not exposed in the UI. Values are passed as keyword arguments to dlt’ssql_databasesource function and override UI values if the same option is set in both places.Example:
{
    "chunk_size": 10000,
    "reflection_level": "minimal"
}
Table Settings
Table settings control which tables are ingested and allow per-table configuration.

Tables to ingest
Choose whether to ingest:
- All tables from the selected schema, or
- a Subset of tables.
If you choose Subset, add the tables you want to ingest. If you choose All, you may still list specific tables below to customize their settings. Any tables not listed will be ingested using default configuration.
Optional fields (per configured table)
-
Write disposition
Choose how dlt writes data to the destination (e.g., append, replace, merge) depending on what the UI offers. -
Primary key
Column (or list of columns) that uniquely identifies rows in the table. Used for deduplication and merge-based loading. -
Max chunks
Maximum number of chunks to extract.max_chunks × chunk_sizedefines the maximum rows extracted. Set to 0 for no limit. Passed to dlt asmax_itemsviaadd_limit(). -
Incremental loading
Enable cursor-based incremental loading for the table. Only new or changed rows since the last run are extracted. -
Table JSON configuration (advanced)
Provide per-table hints not available in the UI. Values override UI settings when the same option is set in both places. These are passed as keyword arguments to dlt’sapply_hints()function for the table resource.Example:
{
    "merge_key": "id",
    "columns": {
       "created_at": {
            "dedup_sort": "desc"
        },
        "deleted_flag": {
            "hard_delete": true
        }
    }
}
Destination Settings
Destination settings define where in Snowflake the data is loaded and allow advanced destination tuning.
- Destination database: Name of the Snowflake database to load into.
- Check privileges: Validates that the app has access to the destination database. If permissions are missing, the app will request/grant the required access.

-
Destination JSON configuration: Provide additional destination options not exposed in the UI. Values override UI settings when the same option is set in both places. These are passed as keyword arguments to dlt’s Snowflake destination factory.
Example:
{
    "create_indexes": true,
    "replace_strategy": "staging-optimized"
}
Pipeline Settings
This section contains optional pipeline-level defaults that affect how and where data is written.
-
Dataset name: Destination schema name for the pipeline output. If not set, the app derives it from the pipeline name as
<pipeline_name>_dataset. -
Dev mode: Enables dlt dev mode. When enabled, dlt appends a datetime-based suffix to the dataset name, producing a fresh schema on each run. This is intended for testing and avoids overwriting existing datasets.
-
Staging
Staging location used during loading:- Internal staging in Snowflake, or
- External staging via a configured external stage (if supported).
Compute settings
Compute settings control the Snowflake resources used to run and load the pipeline.
Fields may vary depending on what the app exposes in your environment.
-
Compute pool
The compute pool runs the job service responsible for extracting data from the source database and normalizing it with dlt. -
Warehouse
The warehouse is used for loading the extracted/normalized data into the destination database. -
Instance family
The instance family of the compute pool the ingestion job runs on. This determines the CPU/memory profile available to the job container. -
Auto-suspend (compute pool)
Number of seconds of inactivity after which the compute pool is automatically suspended.
Set to 0 to disable auto-suspend.
Edit a pipeline
- Open pipeline tab
- Click edit button
- Fill in the configurations
- Save
Monitor runs and logs
Go to the Runs tab to see a history list of the Jobs.
Click the view details button to view:
- pipeline name
- Job ID
- triggered by
- triggered at
- started at
- ended at
- status
Statuses typically move through:
STARTING → RUNNING → SUCCESS or FAILED.
Click the view logs tab to see the logs of the job:
- When each pipeline stage (extract, normalize, load) starts and finishes
- Progress information for each stage
- Performance metrics (processing time, memory usage, CPU, ...)

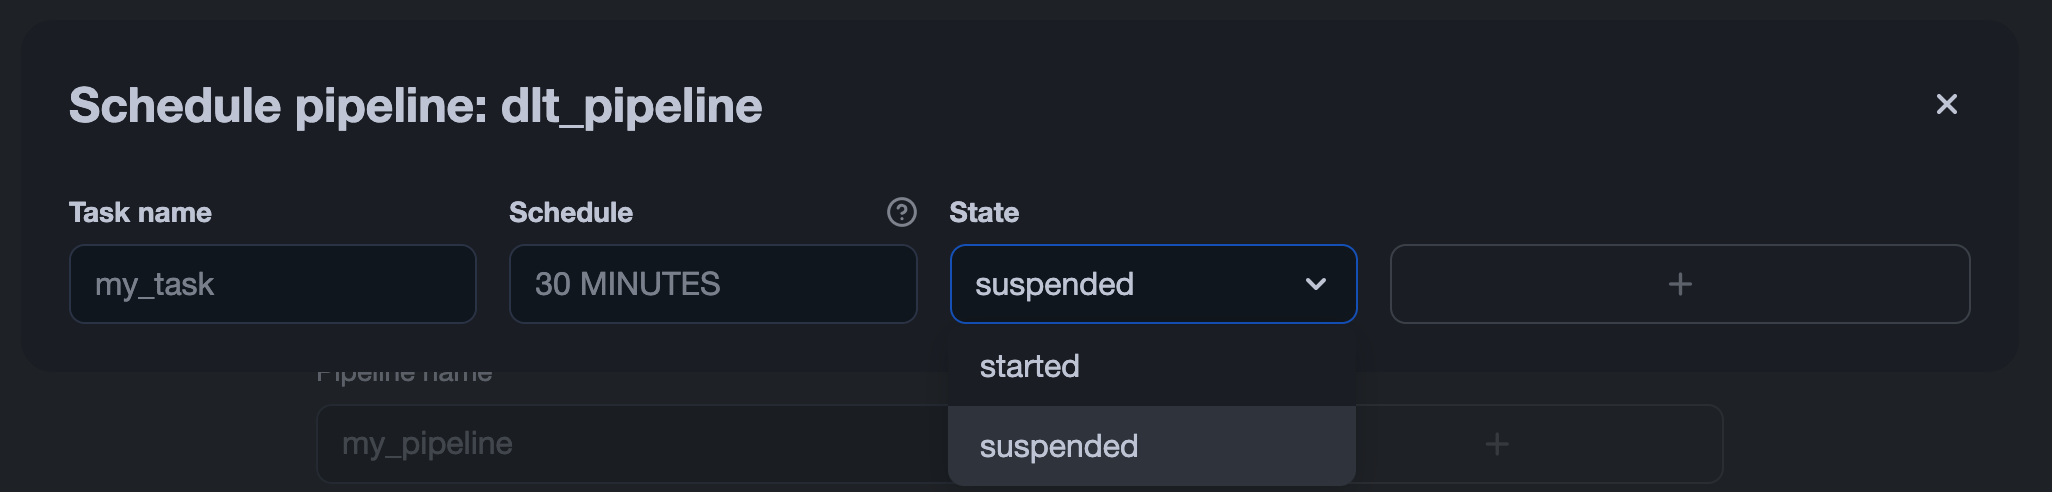
Schedule a pipeline
The app uses Snowflake Tasks to run pipelines on a schedule.
To schedule a pipeline:
- Open the pipeline’s tab.
- Click the scheduling button
- Enable scheduling
- Enter a schedule string
- Click Save

This operation creates or updates a Snowflake task that triggers the pipeline according to the specified schedule. To stop the task, set its status to SUSPENDED. You can do this either via SQL:
ALTER TASK [ IF EXISTS ] <name> RESUME | SUSPEND
or directly in the Snowflake UI by changing the task’s status: